Scott Gress’s notes on doing a leakdown on a BMW E30.
There are 4 write-ups here that I collected off of the Internet. None of them really tell you everything that you need to know. But the sum of them and my notes at the end should be adequate. And if they aren’t, contact me at Scott@Gress.org
Internet write-up #1
1) For most accurate results, engine should be up to operating temperature.
2) Remove all spark plugs.
3) Rotate crankshaft until piston being tested is at top dead center of compression stroke.
4) Screw the spark plug adaptor hose into spark plug hole making the sure the o-ring is seated properly.
5) Connect leakdown tester to a good source of compressed air, preferably a filtered and water trapped source.
6) Adjust the regulator on the leakdown tester so the LEFT HAND GAUGE indicates 100 pounds.
7) Connect the spark plug adaptor hose to the coupler of the leakdown tester.
8) Read the leak down percentage on the RIGHT HAND GAUGE.
![]()
Internet write-up #2
1. If your engine is in the car, it is best to warm it up prior to beginning the leak-down test. In my case the engine was out of the car and cold. So, I was just going to have to accept that the engine not being warm could cause some cylinder pressure loss.
2. Remove all the spark plugs and set them aside.
3. Rotate the crankshaft
to top dead center (TDC) for the cylinder, to be tested. This will allow the valves to be closed, allowing the
combustion chamber to be pressurized. In my case, my rocker assemblies we removed so my valves were already closed.
Although I still moved the piston to the top of the cylinder.
4. Next, lock the engine in place. The engine will want to turn over if not locked in place. Because my engine was already out of the car, I just used a simple flywheel lock.
5. Install the plug
adapter. I had the hardest time finding a 12mm adaptor, so I used an old spark plug, removed its center, and
welded one of the adaptors that came in the kit to it.
6. During the pressurization of the cylinder, adjust the regulator gauge on the leak-down tester to 100 PSI. I like to use 100 PSI because it makes the math simple.
7. Read the cylinders pressure gauge. If it's above 98 PSI (98% - 98 of 100 PSI) you have very little leakage.
8. If the pressure on the cylinder gauge is less than 98%, try listening to what your engine is telling you. Air hissing out the carburetor top may mean a leaking intake valve. If the hissing is coming from the exhaust, then an exhaust valve is leaking. If the hissing is coming from the crankcase, then the rings are likely getting blow-by.
For full race engines, less than 2% leakage should be expected. On higher performance engines, you shouldn't see more than 5% to 8% depending on the engine and degree of break in. An engine with higher mileage could see as much as 10 to 11% leakage per cylinder.
Write up #3 from LongAcre
1. Warm the motor up to normal operating temperature.
2. Remove all spark plugs. Put transmission in neutral. Block wheels.
3. Remove the rocker arms of the cylinder to be checked.
Important note: TURN THE CRANKSHAFT SO THAT THE PISTON IS AT BOTTOM DEAD CENTER. If you do not, the motor will suddenly turn over when you connect the air, possibly causing serious injury to you or someone else working on the motor.
4. Screw the hose into the spark plug hole of the cylinder to be tested. Be sure that it is tight enough to completely seal. Leakage here will give you a false reading - lower than true leakdown.
5. Connect the hose to the tester and to your air supply. Ideally it should be between 110 and 125 psi (175 psi MAX) and be clean and moisture free.
6. Adjust the regulator until the left gauge reads 100 psi. (See Note A below if you air supply cannot maintain 100 psi on the left gauge.)
7. At this point the right gauge will display the leakdown as a %. For example 92 psi on the right = 92% leakdown or 8% leakage (100 - 92 = 8). See the chart below for leakage %. If you get an extremely low leakdown % and the motor seems to be running well check for a blockage in the precision restriction between the gauges.
8. It is best to lower the regulator setting before disconnecting either air line to avoid rapid pressure changes to the gauges.
|
NOTE A: If your air supply cannot maintain 100 psi on the left gauge you may use a lower pressure. Use the chart below or divide the right gauge by the left gauge pressure for the %.
|
|||||||||||||||
|
% leakage |
1% |
2% |
3% |
4% |
5% |
6% |
7% |
8% |
9% |
10% |
11% |
12% |
13% |
14% |
15% |
|
100 psi on left gauge |
99 |
98 |
97 |
96 |
95 |
94 |
93 |
92 |
91 |
90 |
89 |
88 |
87 |
86 |
85 |
|
85 psi |
84 |
83 |
82 |
81 |
81 |
80 |
79 |
78 |
77 |
76 |
76 |
75 |
74 |
73 |
72 |
|
70 psi |
69 |
69 |
68 |
67 |
66 |
66 |
65 |
64 |
64 |
63 |
62 |
61 |
61 |
60 |
59 |
|
Talk to your engine builder about what leakdown % should be expected on new and used motors. Most leakage is past the rings which, when worn, can't seal the compression properly and costs you power. Once you have established a maximum leakage before rebuild, test your motor often to keep it running its best. |
|||||||||||||||
![]()
![]()
Write up #4
1) For most accurate results, engine should be up to operating temperature.
2) Remove all spark plugs.
3) Rotate crankshaft until piston being tested is at top dead center of compression stroke.
4) Screw the spark plug adaptor hose into spark plug hole making the sure the o-ring is seated properly.
5) Connect the spark plug adaptor hose to the coupler of the leakdown tester.
6) Connect leakdown tester to a good source of compressed air, preferably a filtered and water trapped source.
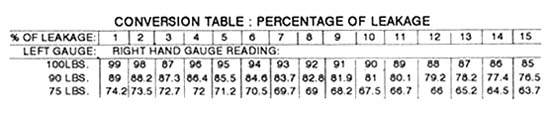
7) Adjust the regulator on the leakdown tester so the LEFT HAND GAUGE indicates at least 10 pounds less than your source pressure. The leakdown percentage conversion table shown below is based on regulated pressures of 100, 90, or 75 psi.
8) Read the RIGHT HAND GAUGE (differential gauge), then look up gauge reading on the conversion table below to get actual leakdown percentage. After noting percentage of leakage, turn the regulator knob counter-clockwise to relieve the pressure. This reduces the shock to the gauges..
Scott’s notes
1. You need a decent air compressor. A 100psi compressor with a 3gal tank is only barely adequate. 125psi and 5+ gal would be a lot better. A long hose is good. That allows you to get your loud air compressor out of your garage. And that not only helps you listen for escaping air, but also retain your sanity.
2. You need a decent leakdown tester. Don’t go buy some cheap shitty thing that has 3 sentences of instructions written by a Chinese high school student. Suck it up and spend some money for a name brand device. Hopefully it will come with decent instructions.
3. You will need an old fashioned "oil can", or something else that will allow you to spurt some oil into the cylinders via the spark plug ports.
4. In my struggles I came across 3 different kinds of leakdown tester. Each test device gives you info in a different way so you have to understand how your device works. Each device has a regulator that controls air flow thru the device. Some regulators will turn a number of rotations and then stop. Others seem to turn forever, which is confusing. Turning the regulator CW (clockwise) opens it and CCW closes it. Leakdown device types:
a. Two gauges with % leakdown. This device has a psi gauge on the left and a % gauge on the right. Near as I can tell it doesn’t care about the exact supply air pressure, as long as it’s reasonable….say 50-100psi. If it doesn’t care about the supply air pressure then you don’t have to be precise about the regulator valve on the leakdown device. When you need air you turn the device’s regulator valve a couple times to open it, and when you don’t need air you turn it a couple times to close it.
b. Two gauges both which read psi. This gauge does care about supply pressure. Ideally, supply it with 125psi air, and then use the device’s regulator to limit the air to 100psi. The math is better if you end up with 100psi air on the left gauge. Note that this makes you dependent on the accuracy of the left gauge on your leakdown device, and it also forces you to note air supply pressure drops caused by your test. Like maybe you started the test at 100psi, but the pressure dipped to 80psi as soon as you allowed air to go to your leaky cylinder. If that is the case then it is the steady state 80psi that is important.
If you don’t use 100psi air, then use the tables on this document in order to figure out your leak %.
This is a harder type device to use because of the requirements for supply pressure and using the tables to get results.
c. Single gauge marked in both psi and % leakdown. Or maybe just marked in % leakdown. This also doesn’t seem to care much about supply’s precise pressure. It pretty much operates just like the two gauges with % leakdown device above.
d. That was all pretty confusing, right. So when you go shopping for a leakdown tester, make sure you get one with good instructions re. how that particular leakdown gauge operates.
5. Figure out how the regulator and gauges work. It’s important to really understand what is going on so you can develop some confidence that you are conducting the tests correctly and also understanding what the gauges are trying to tell you. Just because you think you understand what you're doing and how to interpret a specific result, doesn't make it so. These exercises will help you understand what is going on. Without that understanding, you're early attempts to do a leakdown test are going to be a goatscrew.
a. Air flow control exercise. Connect the leakdown device input to your air supply. Set regulator on air supply to 100psi or a little higher. Hang on to the leakdown device output so your hand can detect air flow. Now play with leakdown device’s air regulator knob. Adjust it this way and that and get a feel for the position of the knob and air flow coming out of the device. If the regulator will happily turn infinite turns, or even 20 turns, you will do yourself a big favor if you figure out where the 3 turns are that actually open and close the damn valve.
b. Note calibration differences between device and air supply gauges. Connect the output of the leakdown device to something that will entirely stop air flow. One of those spring loaded air couplers that connect air hoses will probably do the trick. Turn the leakdown device’s regulator CW a couple turns to open it fully. Now note the psi on the leakdown gauge (left gauge if a 2 gauge device) vs. what the gauge on the compressor says.
c. Note what the leakdown, meaning % or psi of leaking air, is for the air coupler that is stopping air flow in the exercise above. Maybe a little air is leaking out. This would allow you to actually see the device trying to tell you "some air leakage". Seeing that sort of thing is kind of the whole ballgame, because you get to see how the leakdown device is trying to tell you something, before you have to blindly trust it.
(1) The two gauge with % leakdown will have the left gauge showing the supply pressure and the right gauge showing leakdown with the needle fully CW. Far right might say 0% and it might say 100%. The important thing to note is that when there is no air leak (because you’ve stopped air flow with the coupler) the right gauge is at full CW, no matter what the # is printed on the gauge.
(2) The two gauge both with psi device should have both gauges at the supply pressure. No difference between the two readings means no leak. Check one of the tables to confirm that’s how the tables work.
(3) The single gauge device should also have the needle at full CW. It behaves just like (1) above.
d. Observe gauge behavior during leakage. Turn the leakdown device’s regulator CCW a couple turns so it stops air flow. Remove the coupler from the leakdown device’s air output and stick something on the hose such that you can control the air flow. A little regulator valve will work, but so will your thumb. The purpose of this is to simulate some leakage so you can see what your gauges do under those conditions.
(1) At air compressor, use regulator to reduce supply air pressure to a thumb friendly 30psi or so.
(2) With your thumb, or other air pressure control device, on the leakdown device’s output, turn the leakdown device’s regulator CW a couple turns to allow air to flow thru it.
(3) Simulate a leaky cylinder by varying thumb pressure, or whatever you are using to control air pressure, on the leakdown device’s exit hose. Create a little leakage and watch the gauges. Create a lot of leakage and watch the gauges. Take your thumb off and allow 100% leakage and watch the gauges.
This is a good simulation for the tests so be sure that you understand the relationship between what the needles are telling you, and the amount of air flow that you are allowing out of the output hose. No leakage means right gauge fully CW. Something less then fully CW means leakage.
(a) Two gauges with %. When you open the leakdown device’s regulator the left gauge will indicate supply pressure. As you vary the leakage from the output hose, you will see varying degrees of leakage indicated on the right gauge. Total leakage will have the right needle fully CCW. Don’t get wrapped up with whether fully CCW is marked 0% or 100%. You know that fully CCW is 100% leakage and fully CW is no leakage. And there’s enough numbers written in between that you can figure out intermediate leak %’s.
(b) Two gauges both with psi. Left gauge will show supply pressure as set by the leakdown device’s regulator. Right gauge will vary per the amount of leakage you are allowing with your thumb. 0% leakage will cause both left and right gauges to be equal. 100% leakage will cause right gauge to go fully CCW. You will have to use the tables to calculate intermediate leakage %’s.
(c) One gauge with %. This behaves just like (a) except that it won’t show you supply pressure once you’ve opened the regulator valve.
6. Testing. You should now be confident that you have control of the leakdown device’s air flow (it's knob(s)) and you can correctly interpret it’s readings. Set air compressor to 100psi if you have a % reading tester and a little higher if you have the dual psi type tester.
a. Warm up the car if it can be done conveniently. This is harder when the motor is on a stand.
b. Remove all your spark plugs. Remove your dip stick. Remove your rocker arm cover. At your throttle body, use your accelerate cable connection point to open the butterfly valve a bit. Then wedge something in there such that the butterfly remains open. Doesn't need to be fully open, a little bit is fine. For early model E30's, you might want to remove your coolant overflow tank for better access to the spark plug ports.
d. Turn your front pulley bolt to set one of the cylinders to TDC. The easiest way to get TDC is to use the 1-6, 2-5, 3-4 cylinder relationship. When cylinder 1’s rockers are right between the two cam peaks, the #6 is at TDC.
e. Give the rocker arms of the test cylinder a couple gentle bonks with something nonmetallic to ensure that the valves are fully seated.
f. You may have to thread an adapter into the spark plug hole, or your tester may have come with a hose that will thread right in. In either case, you don’t need to thread it in very tight. In fact, be wary of threading it in too tight. Connect the leakdown device to hose in sparkplug port.
g. Turn leakdown device’s regulator CW to allow air to flow thru the device. If you have the dual psi type device, then set device’s regulator for 100psi. For the % reading type devices just use the regulator to allow plenty of air flow.
h. Within 5 secs the gauges will reach a steady state that indicates air leakage out of the cylinder. By now you’ve played with the gauges enough that you should be able to interpret them. If you get a bad reading, say >10% leak, try moving the crank a little and seeing if it gets better.
i. Listen for where air is escaping. Intake, exhaust, or past the rings to the block and then out the oil dipstick port. Take good notes on what results you're getting.
j. Use device’s regulator to turn off air flow. Go to next cylinder. Once you’ve done them all, do them all again. If the results of the first two tests aren’t within 3%, keep at it until they are.
k. Experiment to check if your leakdown tester is sensitive to supply air pressure. Once you’ve tested a cylinder a couple times so you’re confident in your results, reduce your air supply pressure by 50% and see if you get the same leakdown #’s.
l. Try very hard to do every cylinder exactly the same way. If you change any variable at all, you risk making the results of one cylinder not comparable to another. Or you risk this test not being comparable to last month's test.
7. Wet test. A tablespoon or so of oil in the combustion chamber will seal the cylinder’s rings. So if a leakdown test’s results improve, you know they improved because you temporarily sealed your leaky rings with some oil. A better wet test indicates leakage at the rings.
a. Spurt some oil from your oil can on to some rags so you can note how much oil you get with each spurt. Then spurt ~ a tablespoon of oil into the test cylinder. Try to add the oil such that you gently put it on the spark plug threads, as opposed to spurting it right into the middle of the cylinder. Pistons are concave so if you spurt oil thru the spark plug port on to the center of the piston, the oil will just collect there and not go in the rings.
The oil will only seal the rings for a moment or two, so don't spurt oil in all 6 cylinders and because it will be 20min before you get to #6. Spurt oil in the cylinder just before the test.
Now do the leakdown test again on that cylinder and see if the values improve. Improvement means bad rings.