Scott’s Oiling System Rebuild Project
< 2018 edit. I've long since ripped all this out of the car, but I kept the content here in case it helps someone playing around with oil system plumbing.>
Overview. The intent of the scheme is to add an Accusump, add sensors, improve oil cooling, and to make the oil filter more accessible.
All plumbing should be done with ½ inside diameter hose. Both -10 AN and 1/2NPT thread types use ½ inside dia. Hose.
The flow of oil is from pump > filter > oil cooler > engine’s bearing galleys. Therefore:
- Temp sensors need to be before the oil cooler so you know how hot the oil is when it exits the motor.
- Connect the Accusump to the oil return line so it is getting cooled oil, and also so it puts oil into the galley without any delay.
- Don’t skimp on hose quality from block > oil filer > oil cooler.
The biggest pain in the ass about this project is the fittings. Almost every device (remote oil adapters, oil cooler, and Accusump stuff) is ½ NPT (National Pipe Thread), yet the convention for race hose is -10 AN thread. You need to start this project with a decision re. these fittings because that while drive most everything else. Both 1/2NPT and -10 AN fittings use ½” inside dia hose, so the size of the hose doesn’t change.
You will save a fortune if you go with steel or brass hydraulic fittings instead of pretty aviation grade anodized aluminum. You can get steel and brass fittings from your local hydraulic repair shop or from FittingsAndAdapters. Of the two, brass is probably better because steel is so hard that you have to be especially careful threading it into aluminum.
AN fittings.
Advantages. Look cool. Have a reputation for being reliable. Tolerate removal of hoses for maintenance well. They are aluminum and therefore light. Barbed fittings can be put on hoses without much difficulty.
Disadvantages. Costly. A single fitting can cost $30. Expect to pay >$300 for all the fittings. Apply careful attention to hose and fitting compatibility. Crimp-on fittings require special tools and some practice to get right. If you are buying your fittings mailorder, expect to end up in a hassle where your original plumbing plan goes thru 10 modifications and each time you have to buy different fittings and wait a couple days for them to arrive.
Things to be aware of. There is a type of AN connector that needs an O-ring. I don’t know if they are compatible with normal AN adapters so it’s safest to just stay away from them.
Some female AN fittings have swivels, some do not. AN fittings have to be screwed down tightly. This means that if you have a 90deg fitting, something needs to be able to swivel so you can orient the 90deg in the direction that you want. When you are shopping, closely inspect the details on each fitting to see if it mentions swiveling.
Some crimp on AN fittings are reusable and some not. Get the reusable ones because your hose lengths will always be wrong the first couple of times.
Hydraulic shop steel JIC fittings.
JIC threads are a little different then AN threads, but for our purposes the two are compatible 37deg fittings. They are far less expensive then pretty anodized aluminum AN fittings. Most 45 and 90deg adapters at the hydraulic shop will be JIC. They are heavy.
Hydraulic shop steel barb fittings.
These are dirt cheap and childsplay to attach to hose. They are available in NPT threads so they connect to the remote oil filter adapters, Accusump and Accusump valve, and oil cooler without adapters. This means less complexity, less cost and easier hose runs. They are heavy. Make sure that your barbs allow the hose to spin. If, for example, you get a 90deg adapter that has a barb integrated into it, once the hose is connected to the barb, you have a permanent connection. You'll probably have to cut the hose in order to unthread the 90deg barb. Instead, get a separate 90deg adapter and then get a barb that allows the hose to turn. Then when you need to pull things apart you can unthread the barb from the 90deg adapter.
The hydraulic shop will tell you that hose clamps are unnecessary, but I’d call them a comfort nonetheless. I used hose clamps on all my hose-ends.
NPT notes.
- Be really careful threading male NPT fittings on to female aluminum fittings. NPT is a tapered thread and is design to cause some stretching of the female fitting. Too much torque and the steel fitting will damage the aluminum fitting. If in doubt, undertighten. It doesn't take that much torque to tighten an NPT fitting such that it won't leak at 60psi.
- NPT fittings require the use of Teflon tape.
- You can adjust an angled NPT fitting a reasonable amount, but do so cautiously. Obviously, if you have a 90deg fitting, you need for it to point 90deg the correct direction. You can usually get it to face the correct direction when you thread it in, just use some judgment on whether you need to quit torquing now, or you can do one more turn. What you want to avoid is the scenario where you’ve tightened a 90deg fitting as tight as you dared, but then later find that you have to turn the fitting to another direction. Now you are faced with the choices of tightening the fitting more, or loosening it a little, in order to get the 90deg fitting pointed in the correct direction. The former might destroy the aluminum fitting and the latter might leak like a sieve. You can always get a NPT fitting "just a little tighter". But a JIC or a -10AN fitting will become tight and then not move any more. So when things need to end up pointing a certain way, think it thru.
Hose types. Stainless steel hose is has good temp characteristics but is pricey. Is required in the cabin and is a good idea for the hot oil line from block to oil cooler. It’s quality varies from bling to pro. Hydraulic hose is inexpensive and is adequate (200deg/300psi) for lines after the oil cooler. Any hose near the exhaust manifold will need heat shielding.
Plumbing design and big bulky connectors.
Devices that are close together are going to create plumbing problems. If, for example, an oil cooler port is 9” from your remote oil filter adapter, that would seem like plenty of room to run the hose. But a couple AN-NPT adapters and a couple 45deg AN connectors later you’ve two ports that are only 2” apart. And the only way that you are going to run a 2” hose is if the connector orientation and hose length is exactly right. And nothing is ever exactly right.
Cut up pieces of garden hose to test fit hose before cutting your stainless steel hose.
Placement of devices.
Sensors.
Pressure. Gauge and sender have to match so choose carefully. It’s not enough for gauge and sender to be from the same manufacturer. A VDO 80psi sender won’t work correctly with a VDO 150psi gauge. Gauge and sender have to be explicitly recommended for each other. Warning light switches don’t have to match with anything. Most pressure sensors and switches are 1/8NPT which is nicely small and convenient.
Temperature. Gauge, sender, and switch compatibility issues are the same as with pressure. But most senders and switches are 1/2NPT, with only a few being smaller. 1/2NPT is inconveniently large and will therefore take some thinking to implement. There remains some debate on how hot is too hot. I’m planning on warning switches for 220deg water and 230deg oil.
Sensor and switch adapters.
Pressure. The OEM pressure switch location has 12X1.5 threads. Find a 12X1.5 to 1/8NPT adapter and put a sensor directly on to your block. Or you can go a step better and connect a couple feet of hose to the 1/8NPT adapter and then put a “manifold” on your fender. That manifold will provide multiple 1/8NPT ports for a pressure sensor and warning lights, and it also eliminates the vulnerable sensor sticking out of the side of your motor. 1/8NPT manifolds can often be found in fuel delivery and NOS departments.
Oil Temperature. Temperature sensors and switches need to be located between block and oil filter, so you can catch the temps before they cool down. You can’t remote the switches and sensors because they need to be right in the stream of oil.
I found a remote oil filter adapter (#2 in the diagram towards the end) that had a port already in it....Pegasus #1221. The port was 1/2BSP, which is useless, but Pegasus sells a plug for it, and then you can drill/tap the plug for 1/8NPT. That allowed me to connect oil pressure sensors into the remote oil filter adapter.
Connecting the oil lines to the block.
You need a remote oil filter adapter for the block, and you need the threaded insert that goes between the two. Our oil filter threading is ¾-16. The threaded insert is an e motor part and can be bought from a dealer. Part #11112140435. Like everything, remote oil filter adapter ports are usually threaded NPT. The picture below shows the remote oil filter adapter with some 1/2 NPT to -10 AN adapters (blue) and 45deg -10 AN hose ends (black). This particular picture came from BF.c and is not from my project.
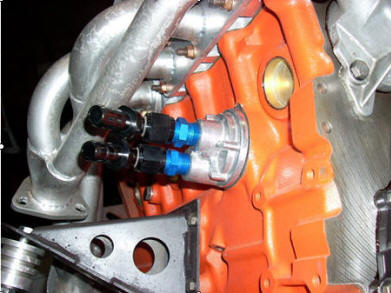
This photo is from Peerless (real name Robert) @E30tech.com, a very helpful guy that runs a BMW shop in LA.
Note how much space the fittings take up. This means that your hose runs are actually fairly short. And short hose runs mean that the fittings have to point to each other fairly precisely.
There is an oil filter adapter type that is shaped like a hockey puck and would go in between the oil filter and the hunk of OEM aluminum that holds the oil filter and has the ports for the oil cooler.
Advantage. It is easy to install and will provide a couple ports for oil pressure sensors.
Disadvantage. It moves the oil filter farther under the exhaust manifold so it’s hard to reach. The sensor ports aren’t big enough for temp sensors. The restrictive OEM oil thermostat is retained. So far all the oil filter sandwiches I've seen are not connected internally. Those with two or for ports have to be connected to something like an oil cooler, or oil won't flow. Canton makes an oil filter sandwich with only 1 port, which is a workable solution for connecting a sump.
Oil filter. You will need a different type of remote oil filter adapter to hold the oil filter. The picture below shows one example, but there’s a variety of designs. Bolt this on to the right side of the car somewhere. The right frame rail is a favorite.

Above is a common example. Below is a photo of the version I bought. Some of these remote oil filter adapters will have ports on them that could be used for sensors.
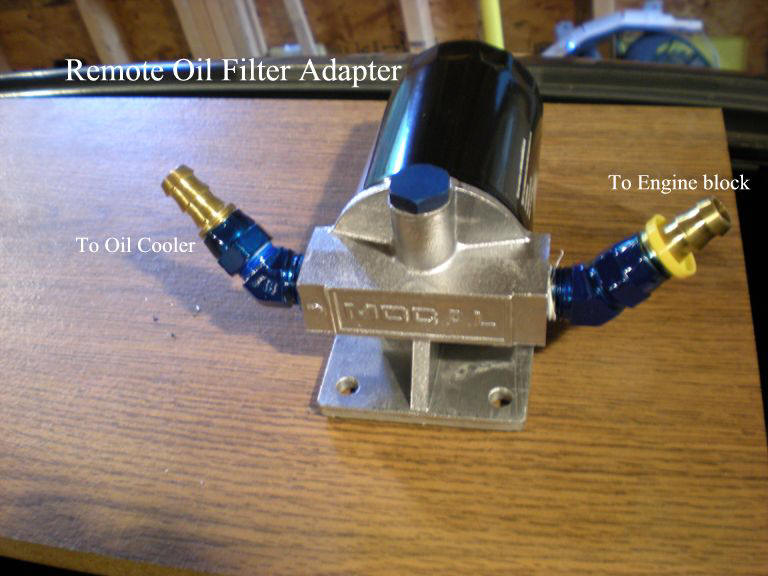
Remote Oil Filter Adapter 2 with JIC 45deg adapters and 1/2 NPT hose ends. This is an early photo so ignore the 45deg fittings. The blue cap at center was later drilled and tapped for 1/8NPT for an oil pressure sensor and switch.
Be careful when you cut NPT threads....Don't forget that they are tapered. Don't tap from the wrong side of a hole and test fit male into female a couple times during the tapping so you don't thread the tap in too deep.
Oil cooler. On the recommendation of another SpecE30 guy that had relatively low oil temps I bought a Tru Cool H7B. I figured that since I was redoing all the rest of the oiling system, I might as well upgrade beyond the OEM oil cooler that was not designed with racing in mind. The H7B is about 11X11X 1.5” and has ~3.5X the frontal area of the OEM oil cooler. Like everything else, it uses 1/2NPT fittings.
Advantages: If you are concerned about peak oil temps you should get significantly more cooling effect as long as it gets good air flow. You can mount it such that it doesn’t hang down as far as the OEM oil cooler. That will make it a bit more survivable in a dirt trap.
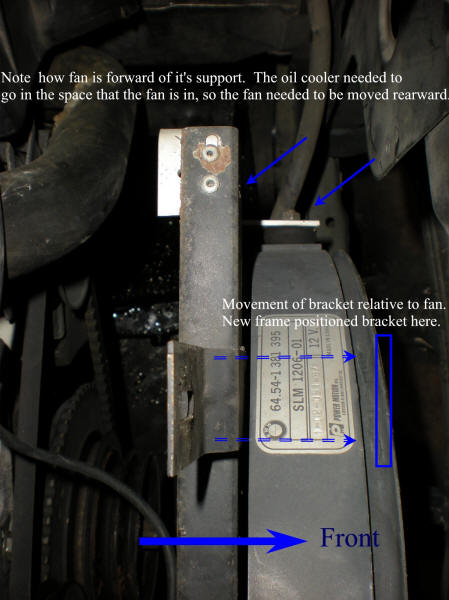
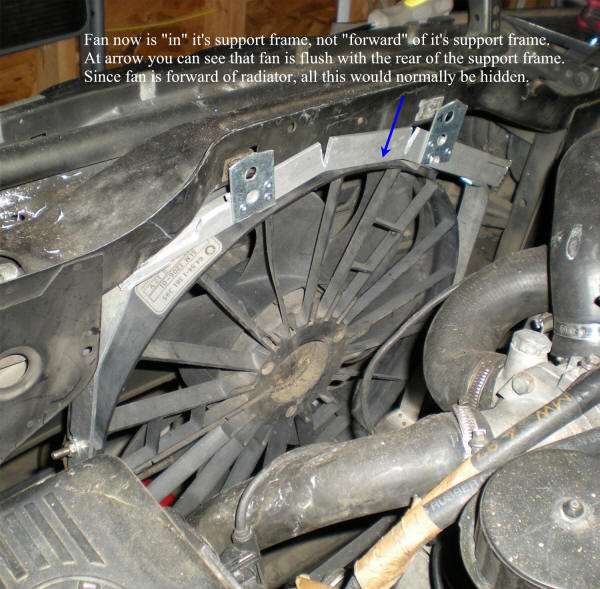
Disadvantages. You have to fab a way to mount it. I also had to move my fan rearward 1.25” in order to create room for the oil cooler. It’s rectangular shape means that it doesn’t fit conveniently below the radiator and get it’s own air flow. Therefore air flow efficiency will become an issue. Some of the oil cooler will be behind your bumper and some of it will be in front of your radiator. Neither is ideal. Be prepared to mod y our air dam to get more air flow to the oil cooler.
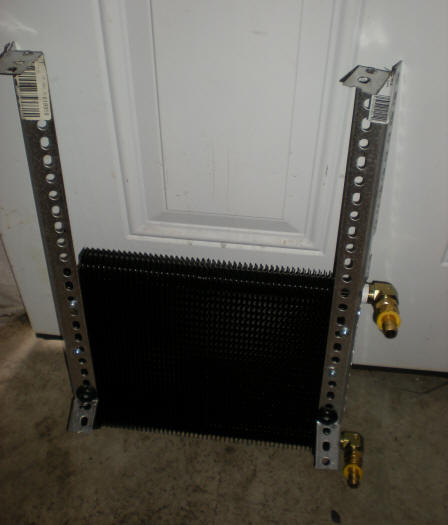
Tru Cool H7B oil cooler with mount brackets. Fittings are 90deg 1/2NPT to JIC, and JIC hose barbs. Note rubber bushings near bottom of mounts to reduce vibration transmitted to oil cooler.
Canton Accusump.
Hose size and sump location. Their tech spt says that ~10 AN hose is fine for all oil plumbing and you can locate the sump where ever you want it in the car.

3qt Canton Accusump in right rear passenger footwell.
Valves. Canton sells 3 valves, only 2 of which are workable for us. The most common and inexpensive valve is the manual valve. There is an overpriced remote cable kit for the manual valve, but you’d save some money buying a choke cable from Pep Boys and fabbing one yourself. The other workable valve for us is called the EPC electric. There are several flavors of the “EPC” electric valve depending on the desire operating pressure. It allows you to remote the valve and just throw a switch. The valve that wouldn’t work for us is the standard electric valve. Apparently it provides too slow of a refill rate for track use. It’s more street oriented.

Accusump manual valve on passenger side of transmission tunnel. Gear shift is visible at top left. Aluminum piping is fire suppression. Hose from valve to engine compartment not installed yet. Valve is mounted using a piece of aluminum with slots cut out for hose clamps. Aluminum fastened to transmission tunnel with 6 sheetmetal screws.
Moroso also sells an oil sump, which as far as I know, is just as good as Canton’s Accusump.
Both the sump and it's valve are 1/2NPT, as usual.
A checkvalve is needed oil the oil flow path just before the Accusump connects to the oil line. See the oiling diagram later in this document for location. The purpose of the checkvalve is to make sure that all the oil from the sump goes to immediately pressurize the oil galley, instead of being diverted to pressurize the oil cooler, filter and pump. It's probably a response time issue. If the accusump is connected near the galley, then the incoming oil from the sump would also have to pressurize the oil cooler and oil filter. But if the sump was connected near the pump, say at the oil filter, then the sump would catch the pressure drop a little earlier and the galley would not perceive a lag in the re-establishment of oil pressure.
I’ve also heard concerns about large psi drops across the checkvalve. Accusump dismissed that as silly. Having played with the valve now, I’d be surprised if it took >2psi to operate.
Operation of the Accusump. Open it up to pressurize the engine prior to starting. Then shut the valve and start the engine. Once some oil pressure has built up, open the valve a little bit to allow the sump to slowly refill. If you open the valve all the way the sump will steal too much oil. It wouldn't be a bad idea to have a pressure valve that indicated pressure at the sump. That would help you monitor sump pressure gain and galley pressure loss when you were cracking the valve to slowly refill the sump.
After coming off of the track rev the motor up to get some good oil pressure for a couple seconds and fill the Accusump. Then close the Accusump valve.
Threads of interest.
http://www.e30tech.com/forum/showthread.php?t=76308
http://forums.bimmerforums.com/forum/showthread.php?t=1113133
http://forums.bimmerforums.com/forum/showthread.php?t=1236651
http://forums.bimmerforums.com/forum/showthread.php?t=1232668
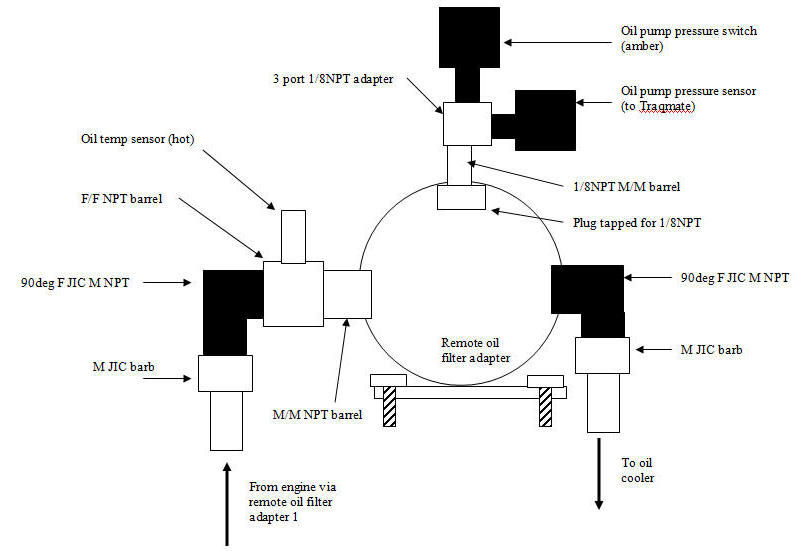
Oiling plan, production version

The oil temp sensor (cool) is wired into the same temp gauge as the hot oil temp sensor. A switch swaps gauge from one sensor to the other.
I decided that I wanted a pressure gauge on the sump so I could more easily control it's refill rate after starting the car.
The pressure sensor on remote oil filter adapter 2 is isolated from the sump by the checkvalve. Therefore it measures oil pressure at the pump. It's not connected to a gauge, I'm going to connect it to my Traqmate. I want to be able to see oil pump pickup starvation in the data. It doesn't make sense to connect the sensor to a gauge because I won't be checking my gauges in the middle of a turn. But the oil pressure switch at the same location will illuminate a bright set of LEDs on the dash that will indicate, mid turn, that the oil pump is sucking air.
Remote Oil Filter adapter 1 (top view)
Production version
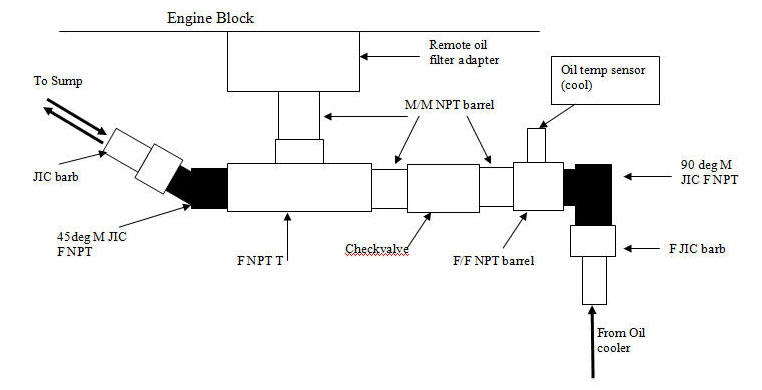
The oil hose from Remote Oil Filter Adapter 1 (on the block) to Remote Oil Filter Adapter 2 (that mounts the oil filter) is not pictured here because it makes the drawing too complicated. The fittings for that hidden hose consists of a 90deg M JIC F NPT and a F JIC hose barb.
The only purpose of the F/F NPT barrel is to provide a large dia location for the oil temp sensor. The length of the oil temp sensor body is such that it needs a fairly large fitting in order to be threaded in. It might be possible to put it in the T though. It’s easy enough to drill and tap the fitting for 1/8 NPT.
Some of the angles depicted here were adjusted for clarity. The oil temp sensor is mounted vertically, not horizontally as picture. The 90deg fitting and barb really point down, not horizontally as indicated.
Approx. costs:
Remote oil filter adapter $40
Checkvalve $25
9 steel/brass hydraulic fittings $30
Oil temp sensor $25.
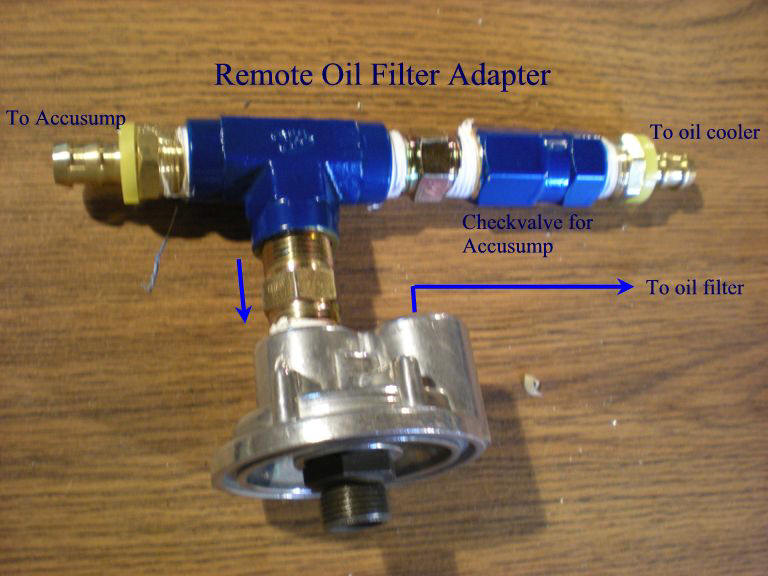
Remote Oil Filter Adapter 1 that fastens to engine block. 2X 1/2 NPT male-male adapter, 1/2 NPT T, 2X 1/2 NPT hose ends, 1 checkvalve. The hose barb at right that connects to the checkvalve did not survive to the final version.
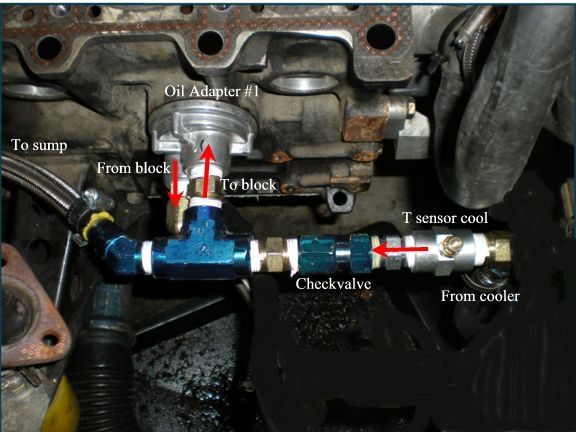
Final version of Remote Oil Filter Adapter #1, installed. Some items at lower right were photoshopped out for clarity. The "From block" connection loops down out of sight, and then back up to Remote Oil Filter Adaper #2. If you look closely you can see some deformation of the yellow plastic ring at the end of the hose going to the sump. That was caused by heat from the exhaust manifold. I'm going to have to put in a heatsheild.
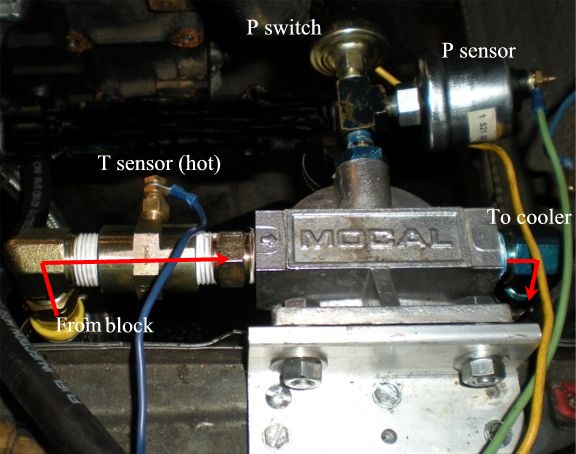
Oil Filter Remote Adapter 2 (top view)
Production version
Tap F/F NPT barrel for 1/8NPT for oil temp sensor (hot)
90 deg fittings actually go down, and not horizontal as depicted here.
Approx costs:
Remote Oil filter adapter $40
Plug $7
Pressure sensor $25
Pressure switch $25
Temperature sensor $25
Fittings $30

Remote Oil Filter Adapter #2 showing 1/2BSP port tapped for a 1/8NPT temp sensor. Sensor is installed. The 45deg fitting at left did not survive to the final production version.
Remote Oil Filter Adapter #2 install location on frame rail. Plumbing associated with Remote Oil Filter Adaper #1 were photoshopped out for clarity.
Alternatives.
1) Connect the sump via the OEM 12X1.5 oil pressure port. It's a little small, but it would probably be ok. You'd have to figure out a different place for your oil pressure readings. Basic and easy solution.
2) Connect the sump via Canton's 1 port sandwich adapter. Easy. Retains oil pressure port. Oil filter goes farther under manifold tho and that makes filter changes a pita.
Sources:
PegasusRacing (good prices but parts take a while to get to the East Coast)
Summit (a little pricey but fast shipping)
Jegs (a little pricey)
ANFittings
FittingsAndAdapters (Hydraulic fittings)
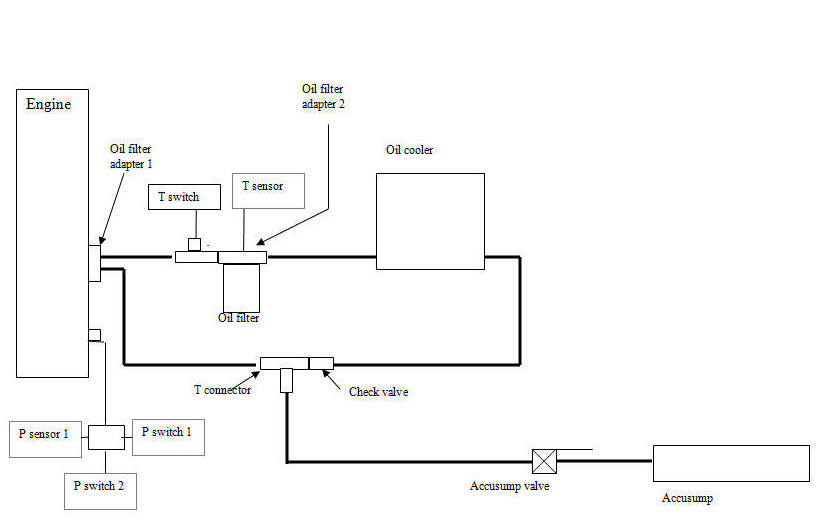
An early version of the oiling plan, one of many. Note 2 pressure switches at galley for amber and red thresholds. No pressure gauge or switch near pump. No pressure gauge near sump. No cool oil temp sensor.